
Real Estate Photography Techniques for Beginners

See Also:
My Detailed Look at Tripods
What Camera & Lens Should I Buy for Real Estate Photography?
Megapixels vs. Sensor Size: Can the Mavic Air 2 Beat the Phantom 4 Pro?
Lighting Gear for Real Estate Photography
How to Make a 360 Walk-Through Virtual Tour
Photography Economics 101: Business Models for Real Estate Photographers
Canon EOS R5 vs. Canon EOS 5D Mark IV
This page contains links to products, so if you find this site useful and use a link to make a purchase, I’ll get a small commission. As an Amazon Associate I earn from qualifying purchases. Thanks!

If you did what I did when I first got started in real estate photography, you may have taken your first paying job without knowing what you were doing and made a lot of mistakes. For my first real estate photoshoot, I took the photos as single shot JPEG’s on a $20 tripod, using my good old Canon Digital Rebel T1i. I didn’t have a clue what I was doing… I just knew that if you put a camera on a tripod you could take longer exposures than if you hand-hold it, which would be useful indoors.
I wrote this article to help others learn a few things that I didn’t know when I first started, and hopefully your first photoshoot will have better results than mine!
I have other articles that talk about lighting gear, tripods, cameras, and lenses. Feel free to check those out as well. This article is going to talk about the following topics as they pertain for the beginner real estate photographer:
Shoot RAW!
Setting up for a photoshoot
Angles, composition, & photo quantity
Handling dynamic range without flash
Taking the next step to B.Y.O.L (Bring Your Own Lighting)
The joy of wireless tethering
Shoot RAW! (Friends Don’t Let Friends Shoot JPEG)
Shoot RAW! You have to go into your camera settings and make sure the image quality is set to RAW. RAW images contain all the information the camera’s sensor has about an image, including shadows and highlights that may not be immediately visible in the image preview. JPEG’s are compressed files that usually have lost shadows, highlights, and details. In high dynamic range scenarios, like indoor photography where you have bright windows and darker interiors, you want to keep all the information you can.
For an example of how much unseen photo information is found in a RAW file, below is a RAW image from my Canon EOS R5. The original photo appears to be completely dark and underexposed, but if I crank the exposure up to +5, it looks like a usable photo! It is a bit noisier than a properly exposed photo, but with RAW files in modern cameras you will be amazed at the dynamic range available for you to work with when you’re editing. Just for fun I used Lightroom to convert the original RAW file to a JPEG and also increased the Exposure to +5 so you can see the difference. This is an extreme example, but it is a good illustration of the advantage of editing RAW files.
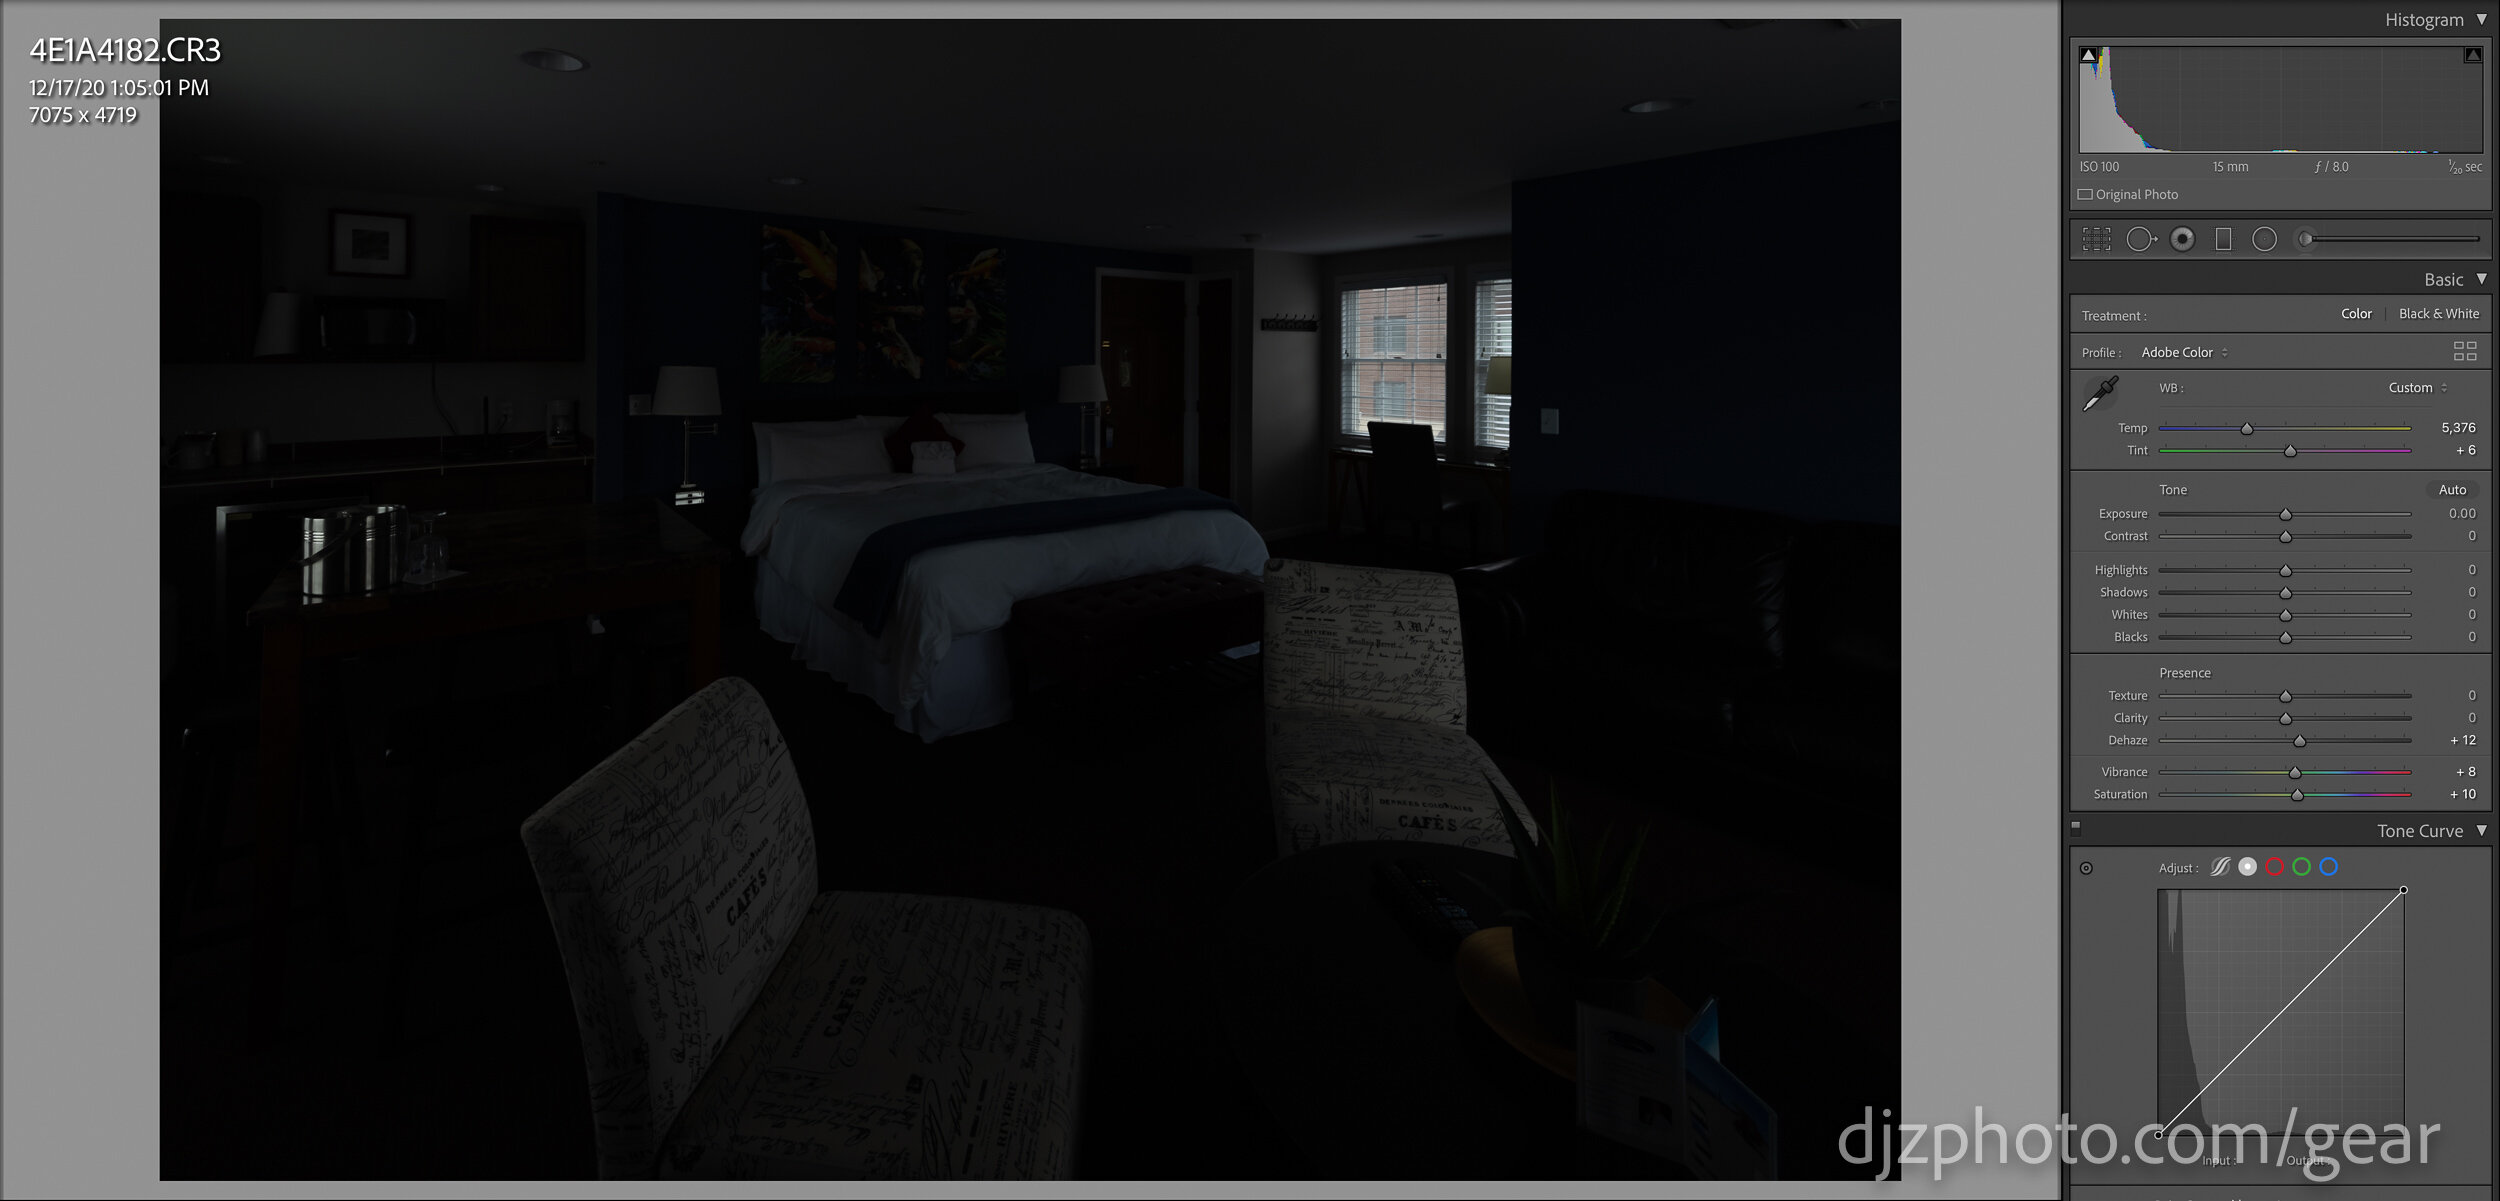


I would NOT recommend getting into a situation where you have to crank your exposure to +5 in Lightroom! I just wanted to show the huge difference in quality and information contained within a RAW file vs. a JPEG file. The RAW image is labeled 4E1A4182.CR3 at the top (Canon’s RAW image files have a .CR3 extension with an EOS R5, and a .CR2 with many previous models). You can see that while it’s not a perfectly noise-free image, it is basically a usable image. If you have been using digital cameras for a long time you would probably find the dynamic range advancements amazing compared with cameras from 5 or more years ago. While it’s pretty unusual to be making such extreme exposure adjustments, it means that when you are editing your images you’ll have a lot more leeway to lift shadows or brighten areas.
Now take a look at the above JPEG image, which is labeled 4E1A4182.jpg at the top. The color in the JPEG image is completely incorrect in many areas, there’s lost information in the couch and other dark areas, and the image is basically unusable even for the web. This is because once the camera creates a JPEG or your computer converts the original underexposed RAW file to JPEG, much of the information in the underexposed areas is gone. You can see pink on the floor near the couch on the right and in other dark areas because the JPEG doesn’t have correct information about what color it’s supposed to be. Since the information is gone the JPEG says, “I don’t what color was supposed to be here, so here is the color pink.”
The advantage of shooting RAW instead of JPEG isn’t limited to dynamic range… it’s extremely valuable for fixing white balance as well.


The first image above is the uncorrected RAW file, the second image is the RAW image with corrected white balance, and the third image is the JPEG photo after attempting to fix the white balance. To correct the white balance of the original RAW image I simply used Adobe Lightroom’s “White Balance Selector” and clicked on one of the white towels, and the result was pretty close to the correct colors. When I did the same thing with the JPEG image the result was an extremely pink image with inaccurate colors. I attempted to fix it beyond what the “White Balance Selector” could do, and that’s the image I posted above, but there was no white balance setting that could get close to accurate colors like the RAW file. You can see the end result has too much green by the sink and too much red in other areas.
It is possible to have accurate white balance in your JPEG files, but you would have to make sure the white balance is correct during the photoshoot. The camera usually will do fine with “auto” white balance if you are shooting outside, but when you’re shooting inside there are many times where the warmer interior lights will cause the white balance to be inaccurate. If you’re shooting in RAW you can easily fix the white balance to your liking on the computer during post-processing. It’s also convenient to be able to change the white balance, tint, or hues using Lightroom’s local adjustments like the radial or gradient filters. It’s much easier to get desired results from local adjustments when you are working with RAW files.
JPEG’s are not all bad though! That is the file type you will usually be giving to your clients and uploading to your website once an image has been processed and edited. Once you’ve edited a photo and the final version is ready to be exported, JPEG is usually the filetype to use. You edit RAW and export finished JPEG’s.
Setting Up for a Photoshoot
So you’ve arrived at a house for your first paid photoshoot. You brought a camera, a wide angle zoom lens, memory card, a couple camera batteries, and a tripod… the basic essentials of a beginner’s kit. Whether you have a removable plate or L-Bracket that screws into the bottom of the camera, you probably will want to attach that before you arrive at a job. When you are getting your camera setup on your tripod, you will probably want to start with the height of the camera around four and a half feet. The height of the camera might vary a little depending on what room you’re in. For example, the camera might be a little higher in kitchens than it is in living rooms or bathrooms. In the kitchen, you can find a good height if you position the camera lens on the tripod to be just high enough so that it is level with the bottom of the kitchen cabinets that are over the countertops. This height will allow you to see over the countertops while not seeing the bottom of cabinets. In living rooms you may want the camera to be a foot lower, maybe a little higher than a person’s head if they were sitting on the couch.


Some good general purpose camera settings for beginners WITHOUT lights/flashes or wireless tethering are as follows:
ISO 400
Av Mode (Aperture Priority)
F7.1
Exposure Bracketing with at least 3 shots being taken automatically, at -3, 0, +3
Drive Mode set to 2 second timer
These settings will produce an underexposed image, a normally exposed image, and an overexposed image. By using exposure bracketing along with the 2 second timer, the camera will automatically fire 3 shots at 3 different exposure values. The 2 second timer also allows you to push the button without shaking the camera.
You will want the camera to focus on points across the room in most cases. Focusing on something too close to the camera will result in everything farther away being out of focus, but focusing on something in the house farther away will allow most of the room or space to be in focus. You won’t find yourself ruining photos by focusing across the room, but you might ruin a photo if you accidentally focus too close.
Angles, Composition, & Photo Quantity
When you get hired for real estate photography, you are getting hired to produce photos (and possible other media) designed to assist a realtor and/or property owner sell a house, building, or land. If you are just getting started, you probably will want to take a high quantity of photos to cover all the required angles, along with a few extra, to make sure it’s enough for your clients. Over time you will get used to what angles your clients like and your eye for composition will hopefully improve, and you won’t be shooting unnecessary angles.
In a standard house realtors will usually want every room photographed, and some rooms and spaces require more than one photo. This is especially true of the main living spaces. Any room that is not isolated by walls probably deserves multiple angles to show how it flows into adjacent spaces. Kitchens and living rooms typically need multiple photos and you may want close up photos of desirable features.
In the photos below, you can see a living area where I chose to take two photos showing the whole room, and one that highlighted the fireplace:


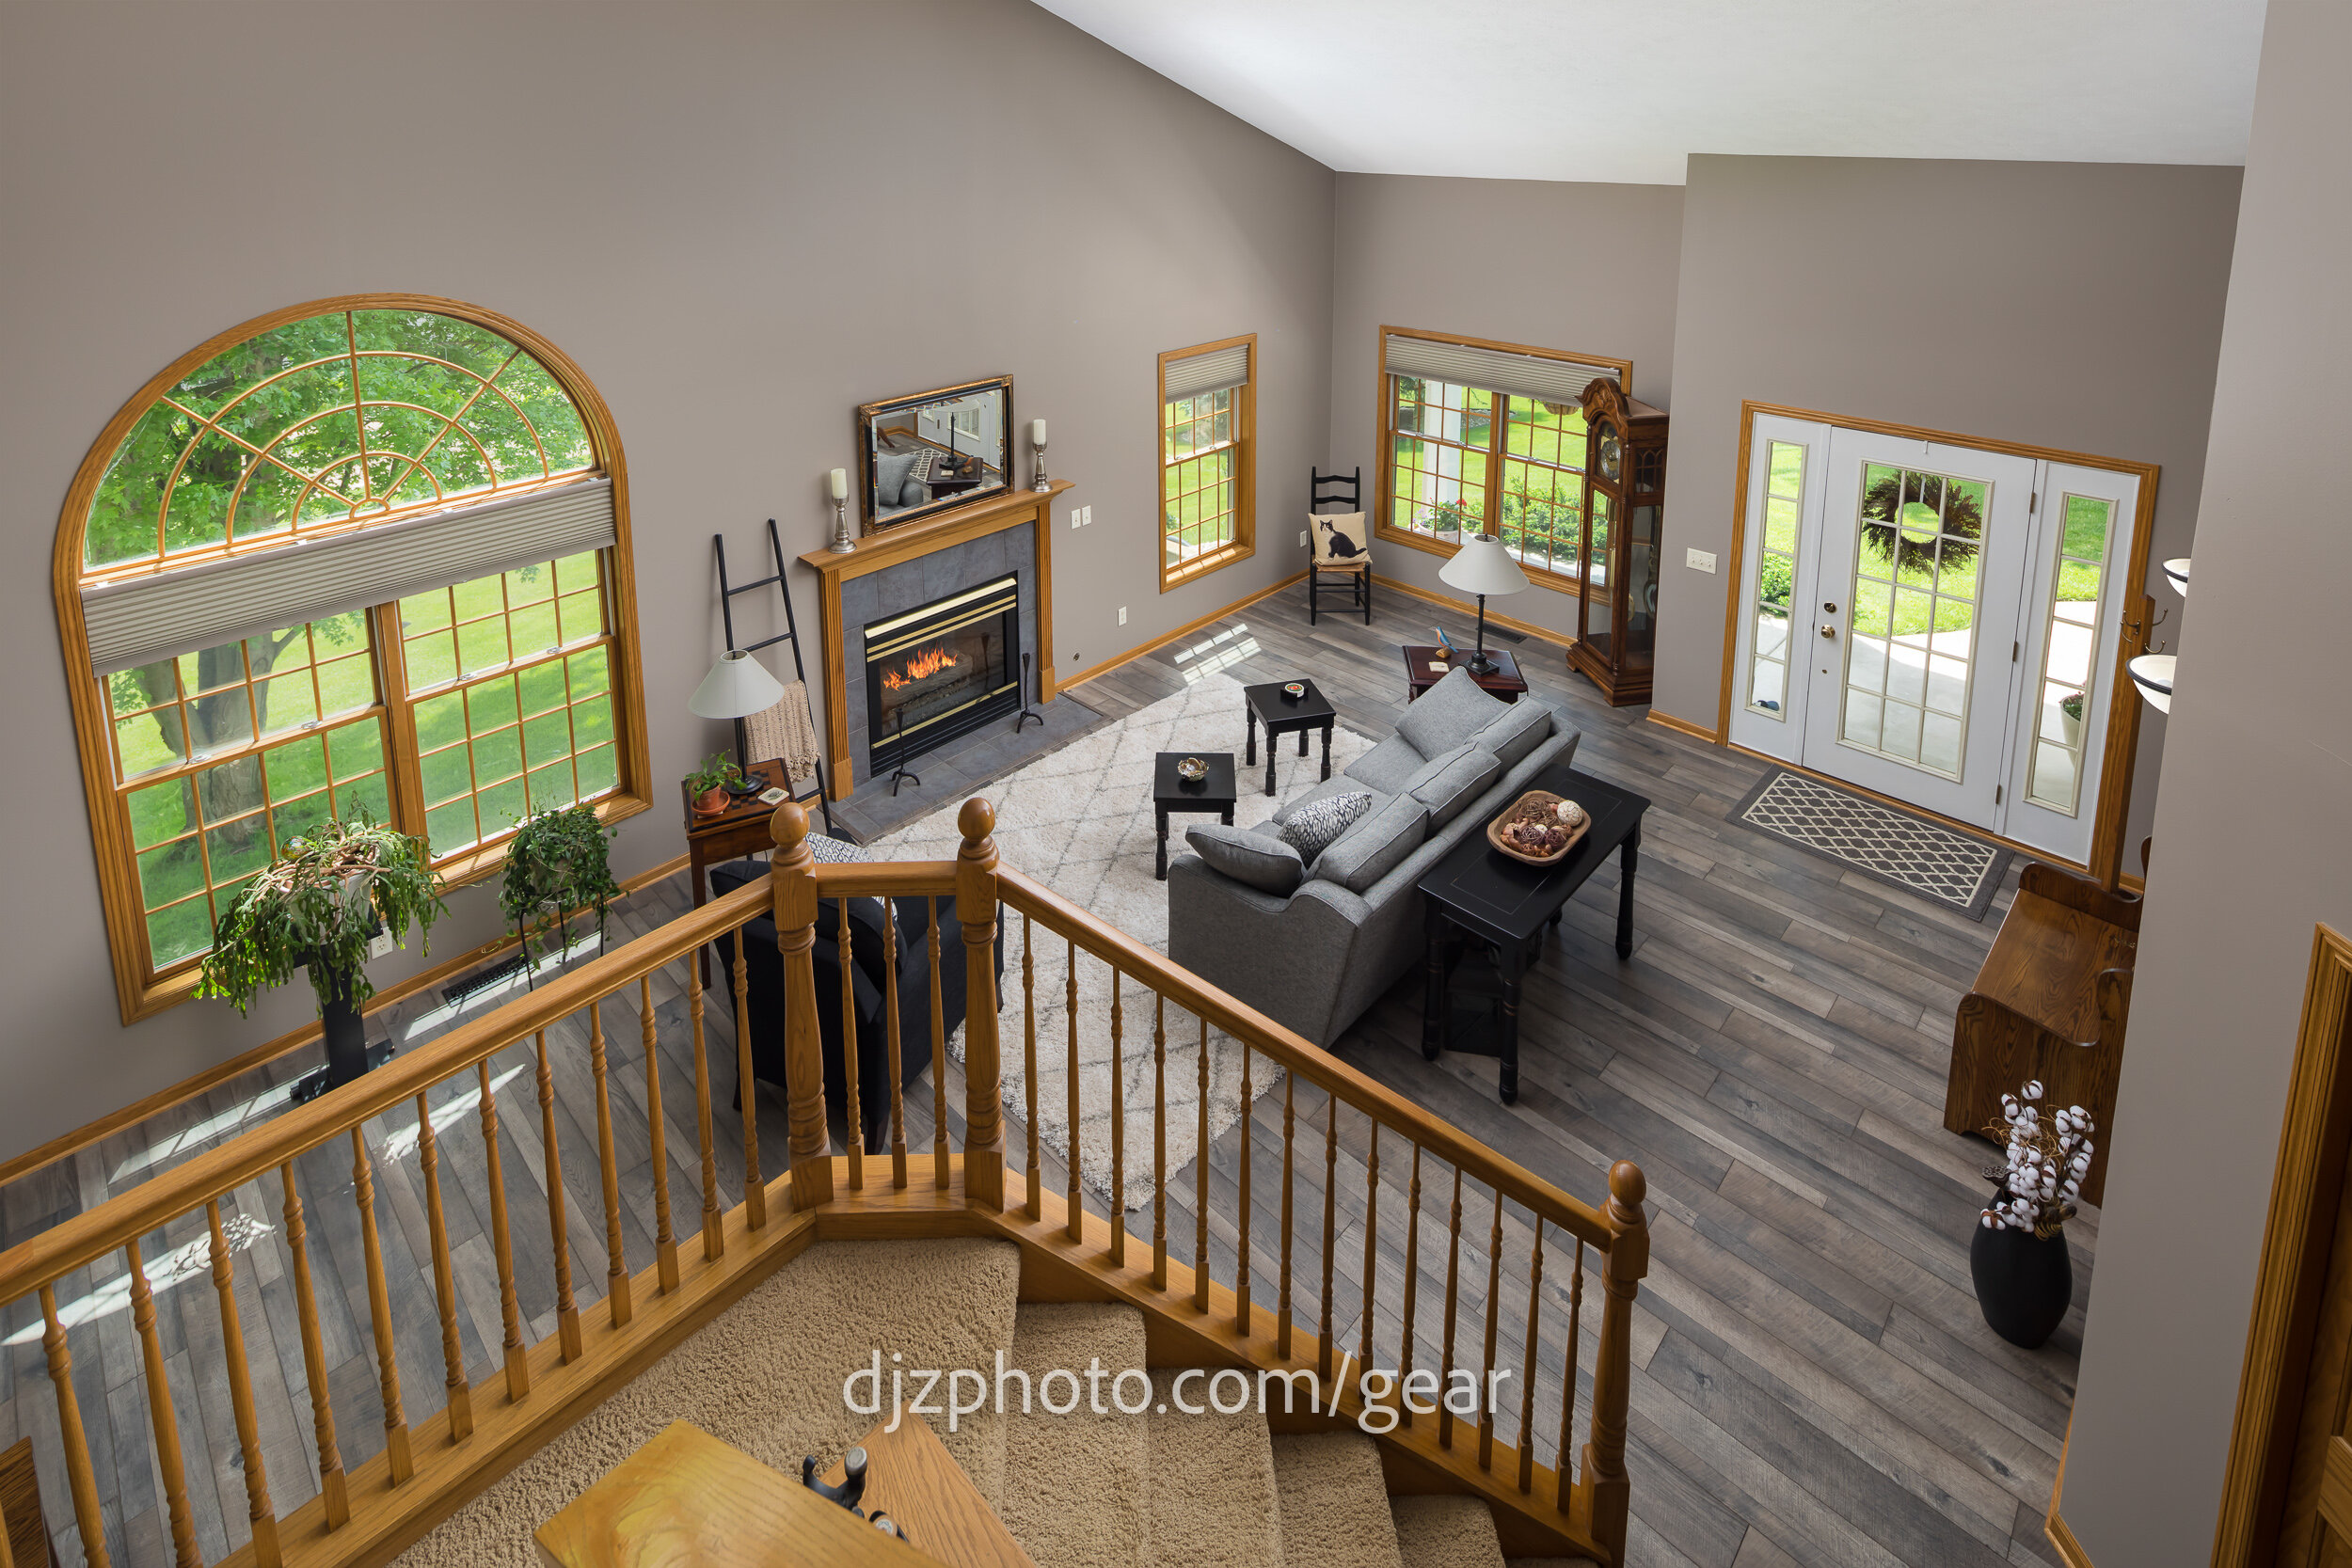
I chose one shot from the top of the stairs and one from the opposite corner by the windows because between the two angles you can see all the important elements in the room including entranceways to other rooms. I wouldn’t really have gained much if I took another shot from the bottom of the stairs or from the front door, and I liked how these positions were able to be frame most elements of the room better than other possible shooting spots. I did the straight on fireplace shot because it’s a popular feature shot. When you’re first starting you might want to take extra shots to make sure you get enough, and make sure you get all the important features that help sell a property.
Bedrooms usually can be taken care of with a single photo:


Sometimes you might need more than one photo of a bedroom if there are special features in more directions than you can capture in one photo. For example, there could be a sliding barn door to the ensuite bath on the opposite wall from windows overlooking a lake. Some clients might want you to photograph the double closets. In these situations you could do the normal bedroom shot, and then grab the sliding barn door or double closet shot before you move on to different areas.
Exteriors can be a little trickier to approach because the layouts of properties vary a lot. Some properties have small yards, some have big yards, some have pole barns, some have trees, some have lakes, etc. Fortunately, when you’re outdoors you can take a lot of pictures with very little effort! Lighting is much easier for your camera to handle outdoors so you can walk around hand-holding your camera, taking as many pictures as you need to cover all the important features and angles. I personally prefer the look of home exteriors when they are shot at 24mm or higher (full-frame equivalent) focal length. This minimizes distortion and makes the shape of the home exterior look more natural. This means that in most cases it is better to stand farther back from the house and zoom in rather than stand close to the house and zoom out.
(For lens recommendations, see my other article about cameras & lenses)
Composition is something that will take time, practice, and maybe even research. If you are not using a tilt-shift lens (most beginners probably shouldn’t be), one trick you can use indoors to reduce the amount of ceiling in your photo is to zoom out or back up as much as possible so there is extra space in your photo on the edges and then tilt the camera down slightly. This will increase the amount of floor in the photo and reduce the ceiling (unless the ceiling is interesting) and you can straighten the verticals in Lightroom. For example, the first photo below is an uncorrected ambient/natural light shot that shows the downward tilt, and the second photo shows the final edited shot with straightened verticals:


In the final straightened photo above you can see that I lost a little bit of space on the right and left, and some on the ceiling, so if you use this trick you have to make sure you capture extra space to keep everything important in the final photo.
For a beginner photographer a good minimum photo quantity for your smallest photo package should probably be at least 20 photos (including a few exteriors) for a small house. A very small condo could be fewer photos if you think you have taken every possible angle the client could want, but if you deliver too few photos your client might be disappointed. It’s a great idea to talk to your client about how many photos they expect! In one case I had to shoot a 20,000 square foot residence in a specific amount of time, so I had the realtor make a specific shot list of about 35 interior photos.
There have been multiple times where I’ve showed up to an average sized house but the entire place was an absolute mess, so I had to contact the client and see if they want to waste their money and my time photographing piles of junk. In more than one of these cases I just took a couple interiors with a normal amount of exteriors and charged a minimum rate. If you spend time and money driving to a location but the work is canceled or reduced, you should still charge an appropriate amount of money to the client who requested you drive there.
Handling Dynamic Range without Flash
After the photoshoot is done and you have all the RAW files on your memory card, it’s time to import & edit your photos.
I have used a variety of software ranging from HDR batch processors, RAW processors, Photoshop competitors, and more. The suite that I use currently is included in Adobe’s Creative Cloud Photography Plan, which includes Adobe Lightroom and Photoshop. Lightroom is a good way to import your RAW files, organize them, edit photos, and export the final versions to JPEG to deliver to clients. Photoshop is good for when you start getting into more advanced editing and blending techniques.
After importing your RAW files into Lightroom, you may find the photos look a little dull! They will always need at least some adjustments. It’s a great idea to create a Lightroom preset that includes lens & chromatic aberration corrections, a slight bump in shadows, a slight reduction in highlights, and any other common adjustments that will probably be applied to most photos you import.
By looking at the unedited RAW photo below (the first photo in the gallery) we can see why interior photography can be a problem… the outside is very bright and the inside can be very dark or unbalanced. We as photographers have to figure out a way to control the dynamic range and make the rooms we photograph look more appealing.
There are at least few ways to control dynamic range without using flashes & strobes, but the easiest way is to merge your bracketed exposures into an HDR photo, and then edit the image to taste.
Let’s see what we can do with the kitchen photo. The first image below is the original RAW, the second photo is the original RAW with lots of editing, the third photo is 3 exposures merged to an HDR photo in Lightroom, and the fourth photo is multiple natural light (or “ambient”) exposures blended with multiple flash exposures.


The single RAW file actually managed to be pretty good after lots of Lightroom adjustments, but if you look at the HDR photo there is more detail in the window and hanging glass pendant light. The HDR photo did require a bit of editing as well, however. I created the HDR photo by selecting the three exposure-bracketed kitchen exposures (-3, 0, +3), right clicking (AKA control clicking or two finger clicking) on one of the photos, and selecting “Photo Merge” > “HDR.” You could also select the three exposures and push Control-Shift-H. This gives me an image titled 4E1A3870-HDR.dng, which contains lots of extra dynamic range merged from the three original exposures. Once you get the HDR .dng file, you can edit the image to your taste with local and/or universal adjustments. The HDR image is high quality enough for a real estate image, especially if you are a beginner.
The final photo above shows how you can change the look of an image if you use your own lighting equipment. You might notice that the glare on the floor to the right of the island is gone, the lighting on the bar stools is more interesting, there is more detail in the windows, and the island glare is minimized.
While HDR is commonly used by real estate photographers and is usually enough to get regular paying clients, what if you want to take it to the next level and get started with flashes & strobes?
Taking the Next Step with Lighting
In the kitchen example in the previous section, the natural light wasn’t too bad. Natural light can vary quite a bit and may be good or bad depending on many factors. You will have challenges with natural light in many situations, including:
Sunshine hitting green grass outside causing green color casts on the interior
Super dark colors and few windows on the inside making interior lighting unbalanced
Houses in the forest
Natural light coming from behind the camera making the scene flat
Blue daylight conflicting with warm interior lightbulbs
Dark interiors with important views out the windows
It is situations like these where off-camera flashes & strobes are very useful for creating your own light direction, improving color, and balancing light how you would prefer.
Check out images from a real estate scene below. In one image, most of the light is being supplied by the interior lightbulbs. In the second image, I turned the interior lights off and captured a longer exposure using only daylight. For the third image, I lit most of the house myself using flashes, and then blended some elements of daylight and interior lightbulbs back in using Photoshop. Look at how different the three images are, even though it was the exact same shot taken at the same time of day:


I prefer the look of the third image, which is why I put the effort into it. But the third image took MUCH longer to produce than the two ambient light shots. I spent less than a minute shooting the interior lightbulbs image and less than a minute editing it, and it’s just a single RAW file. Same with the natural daylight shot… minimal effort, single RAW file, no HDR, no time at all! For the third image, however, it took several minutes onsite and at least several minutes for editing. I used five flashes & strobes placed in different places throughout the scene, created various flash-lit exposures, and spent time carefully blending all the different shots with the natural light shots in Photoshop.
Is all the extra time worth it?
At the time I shot this house I was trying to improve my techniques and increase image quality to be the best photographer I could be, so my personal answer was “yes.” However, if you are just getting started the answer is probably “no.” The extra effort also may not be right for you if you are a “High-Quantity” photographer who takes multiple jobs per day and speed is of the essence.
For more info on the sliding scale of quality vs. quantity, see my other article, Photography Economics 101: Business Models for Real Estate Photographers.
Even though you probably won’t have a super complex lighting setup and workflow as a beginner, there are ways to improve your images using just one off-camera light.
If you’re going to use a speedlight, I highly recommend getting a 4-8’ Wooster Sherlock pole, pole adapter, and cold shoe mount for the flash. This combination is easily one of the most useful tools I have used over the past several years!
Another option for your go-to single light setup is to go nuclear and get yourself a 600 watt strobe like the Godox AD600 (don’t forget a transmitter). You can’t put it on the end of a stick like a speedlight, but you can hand-hold it and light any large space with ease.
Here are a few ways you can improve certain images with just one light.
Bounce Flash off the Ceiling Behind the Camera to Show Important Views
Below we have a bedroom that has a balcony overlooking Lake Michigan. Unfortunately, the dynamic range difference is too much for the camera to show both the indoor bedroom and the view of the lake. I tried Lightroom’s HDR function (second image below), but the view still wasn’t great even though I had highlights at -100 and shadows +100. Darkening the view to make it more clear and colorful made the bedroom look too dark, and brightening the bedroom led to the view being too bright. Sometimes Lightroom’s HDR can handle similar situations pretty well, but it didn’t do a great job here. In order to show the lake view I resolved the dynamic range issue by firing a 600-watt light into the corner of the room behind the camera (third image), which allowed the interior bedroom to be balanced with the outside brightness.


While the interior and exterior are balanced much better and the colors are more vibrant, the lighting feels unnatural since the flash was behind the camera. My brain tells me that the light should be coming from the windows. How can we resolve this?
None of the above images were edited in Photoshop… they were just quickly adjusted in Lightroom. Once you start editing photos in Photoshop the time spent editing those images will dramatically increase. But for a situation like this, you may want to put some extra time into the editing to highlight the view of the lake as a feature of the bedroom scene (and the rest of the property).
Since I like the direction of light in the natural light photo, but I like how the windows look in the flash-lit photo, I can open both of these images as layers in Photoshop in order to use parts of each image. Just select the two images you want to blend, control-click, and select “Open as Layers in Photoshop.”

Once the photos opened up as layers in Photoshop, I made the bottom layer the flash-lit photo, and the top layer the ambient/natural light photo. I then created a black mask for the natural light photo and brushed in white on the mask at 0% hardness to add some natural light back into the photo, being sure to stay away from the window with the view. The white part of the mask means that part of the layer is visible, and the black part of the mask indicates where the layer is not visible.

By combining the two images I get a good view out the window while maintaining a fairly natural look for most of the image, which makes it seem like the light is coming in from the windows.

It should be noted that the flash-lit photo mentioned above was produced using a 600 watt strobe. In order to see the view out the window, my camera settings were ISO 200, f8, 1/200th of a second (my camera’s max sync speed at the time). That means if you have a speedlight rather than a 600-watt beast, you might not be able to bounce off the ceiling since that reduces the flash power… you may have to fire the flash directly at the windows. Firing straight at the windows means the shadows produced by the light will be harsher, but it still works in a similar way. You will just have to be careful of flash reflections, and sometimes you might need to take more than one flash shot to get rid of reflections, hot spots, or shadows.
See also: If You’re Shooting Architecture or Real Estate, Omni-Directional Lighting is your Friend
Speedlight Ceiling Bounce plus a Direct Shot at the Windows
If you have a scene where the direction and color of the natural light are pretty decent and just need to control window brightness, you can use a speedlight to supplement the natural light and then fire it at the windows to further recover the blown highlight areas. For the next example, the natural light photo with an exposure of 1/15th of a second was pretty decent except for the window areas. So I cut the natural light in half with an exposure time of 1/30th, and added a speedlight on a stick firing into the center of the ceiling. The windows were more controlled and the lighting was more balanced, but since I wanted the nice tree colors outside I took another shot where I fired the speedlight directly at the windows with an exposure time of 1/125th of a second, as seen below:


The final image allows you to see some color from the trees outside, and the lighting is pretty natural and balanced. The only reason I had to use the natural light image was to cover up the part of the ceiling where the flash was sticking out into the frame. Here are what the layers looked like in Photoshop:

Take Control of those Bathrooms
Bathrooms can often be a little tricky for a variety of reasons, and my go-to tool for those small & tricky spaces is a speedlight on a painter’s pole (with a pole adapter and a cold shoe mount adapter). With the pole I can stand behind the camera and stick the light forward into the bathroom in the middle of the ceiling with ease to create better lighting. A lot of the time, bathroom lighting isn’t great, so it’s a great option to have.


Lighting the Distant Darkness
You may find yourself with a dark room or area off in the distance. These situations are fairly easy to handle if you take the extra flash frame(s) to light them, and then Photoshop them into the final photo. For example:


As you can see in the first image above, this kitchen shot was just about complete, but there was a dark hallway in the distance. The 2nd and 3rd shots in the above gallery show individual flash shots I captured with exposure at 1/200th. The 4th image in the gallery above shows the final image after adding those individual flash shots in with Photoshop, setting their layers either to “Screen” or “Lighten” mode.
Stop Glaring at Me
Another great reason to carry at least one light in your gear bag is the ability to resolve glaring problems (pun). There are many times where natural light includes distracting glare on shiny surfaces, like countertops and wood floors. If you have at least one light with you (especially if it’s a 600-watt), you can “turn the natural light down” by reducing your exposure time to the max flash sync speed of your camera (which usually is between 1/160th and 1/320th, so check your camera’s specs). Then, fire a flash or strobe at the ceiling above the glare (or directly at the glare from above if you aren’t getting enough light from a ceiling bounce). Doing this will change the lighting in that area so you will have more to work with in post-processing. For example, in the gallery below I had some very harsh direct sunlight coming in and also some larger bright reflections from the windows distracting from the lovely wood color and texture on the floor:


Though more than one lights were used in the flash-lit frame, the concept is still possible with one light. By changing the angle at which the light hits the floor to be from the ceiling instead of from the windows, the light no longer reflects into the camera lens and I can see the color and texture of the wood floor. Direct sunlight on the floor is impossible to completely remove at 1/200th of a second, but by using my own 600-watt strobe it’s a pleasant addition rather than a distracting eyesore.
Fix Color Craziness
Sometimes if it’s sunny outside and direct sunlight is hitting trees or grass right outside a window you can get some pretty crazy color casts. That’s another great time to have a flash, because you can minimize crazy colors by using your own lighting:


Judging from the shadows created by the lamp I may have had 3 lights in this bedroom, but the concept still applies if you only have one light.
Another thing I did while editing is brush in some natural light in “luminosity” mode and reduced the opacity of the natural light layer to 24%. This brought back some of the natural light look by the chair, where there is a window around the corner. Luminosity mode allows you to use the brightness of a layer without the colors.

The Joys of Wireless Tethering
If you are just starting out and using the camera’s bracketing function to produce natural light HDR photos, you probably don’t need to worry about wireless tethering. But once you start using off-camera lights and adding complexity to your photos you will probably want the freedom to move about the room, change settings, and trigger the camera without touching it.
Most modern cameras have built in WiFi that allow you to connect with the camera from a smartphone or tablet using camera manufacturers’ apps. There are also third-party hardware solutions if you want a different feature set for tethering. Either way, it opens up the door to new possibilities.
I always use an iPad in a case with a neck strap, which allows me to walk around the room hand-holding lights without having to set the light on a stand and walk back to the camera to take the shot. Even if you are just adding a single flash frame into your workflow with bracketed natural light shots, it is best not to touch the camera in between shots to change settings for the flash shot. The more you touch the camera in between shots, the more risk there is of the photos being misaligned for Photoshop blending. Wireless tethering is also beneficial because you can take as many natural light shots as you want at different exposure values, while using a larger screen for image previews. You can even show the image previews to homeowners and clients without making them try to discern the images on your camera’s small built-in LCD.
Once you’re wirelessly tethering, you probably won’t be using the camera’s timer drive mode or exposure bracketing. Instead, You will probably be using the camera’s manual mode. For the ambient (natural light) exposures, you could start with the exposure that’s bright enough to expose the darkest areas of the photo, then expose your way down by 1 stop at a time until you have a dark enough photo to expose the windows properly. For example, maybe an exposure time of 1 second is bright enough to get all the dark areas. So then you take the following natural light photos:
1 sec, 0.5 sec, 1/4 sec, 1/8 sec, 1/15, 1/30, 1/60, and 1/125.
If the view out the window is extremely important, like mountains or lakes, be sure to lower the exposure to whatever makes the view look good. On a sunny day at ISO 400, this might even be something like 1/400 or 1/500. If you have an off-camera flash with you, it would be a good idea to try a few things to make the windows look good (direct flash at the windows, ceiling bounce, etc.) with your camera’s max sync speed in mind. As long as you give yourself a few options you will have something to work with in Photoshop if necessary.
Conclusion - This is Just the Beginning
Hopefully this article will give you some ideas that will jumpstart your real estate photography. This article is intended for beginners, as the techniques I mentioned are just the tip of the iceberg. Once you start shooting and trying things out, you will probably realize “you don’t know what you don’t know.” I personally feel like the learning never stops!
If you found this article helpful, check out my other articles:
My Detailed Look at Tripods
What Camera & Lens Should I Buy for Real Estate Photography?
Megapixels vs. Sensor Size: Can the Mavic Air 2 Beat the Phantom 4 Pro?
Lighting Gear for Real Estate Photography
How to Make a 360 Walk-Through Virtual Tour
Photography Economics 101: Business Models for Real Estate Photographers
Canon EOS R5 vs. Canon EOS 5D Mark IV
Most articles have links to products, and if you make a purchase using one of those links, I’ll get a small commission.
Thanks!